Contact Us

How can we help?

3143 Ponce De Leon St
New Orleans, LA, 70119
United States

5043040635

swirl & savor

Filtering by Tag: recipes-pasta

Pesto and Pigato, Perfect Pairing from the Ligurian Coast

Beth Ribblett


Who doesn't love pesto, that rich, green highly aromatic sauce known for its decisive yet delicate flavor? Fresh pesto is one of those foods that epitomizes Italian cuisine  - a blending of 6 high quality ingredients that when made fresh can make the most simple things taste divine.

Village on the Cinque Terra from the hiking path.

I can't eat pesto without thinking of its famous home in Italy, the Ligurian coast. A small and breathtakingly gorgeous region, Liguria sits on the Mediterranean Sea in Northwest Italy.  The location along the pristine coastline, its back set up against the steep hills of the Appennini Mountains, give it a unique microclimate and landscape that produces the majority of the ingredients used to make their traditional pesto—Genovese basil, Ligurian extra virgin olive oil and even pine nuts from the Stone Pines that grow in abundance. And it's bordering region, Emilia Romagna, provide the essential Parmigiano Reggiano cheese.
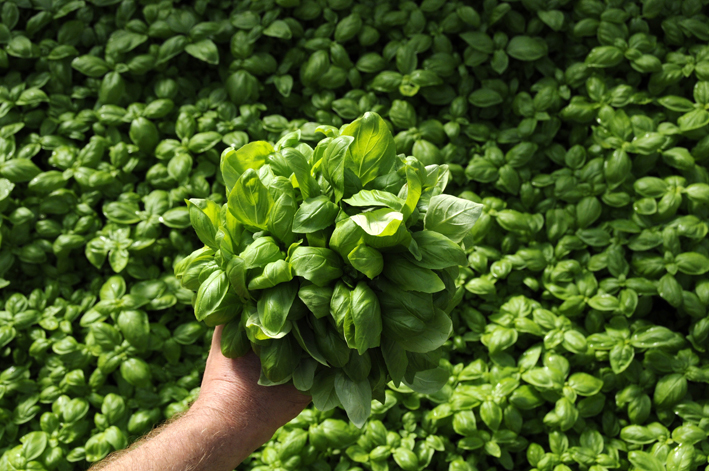
Ligurians use only the young tender leaves for their pesto.

Ligurians are very proud of their pesto and fiercely defend their traditional recipe, Pesto alla Genovese. This is a D.O.P. protected food that has to be made in a precise way and with very specific ingredients. The primary ingredient being D.O.P. basil from Genoa, for example, because the soil and climate in that particular area gives the basil a flavor that’s impossible to replicate anywhere else in the world.  

Trofie pasta, Vernazza 2004 trip
The are also very specific about they use pesto, never randomly adding it to chicken or fish as we often do.  Pesto is used for 2 things, pasta and soup.  But again, not just any soup but specifically minestrone alla Genovese, a staple of daily life on the Ligurian coast.  In terms of pasta there's a bit more variety here as gnocchi, a local version of Lasagna and a few traditional dried and fresh pastas, are acceptable.

And of course the perfect pairing comes in a the form of a local wine made from Pigato (of the same DNA as Vermentino, Rolle and Favorita).   The Punta Crena Pigato is produced by the Ruffino family who has be farming this particular land for the past 500 years. And they tend their vineyards as they always have; terraced by hand, grapes picked by hand, nothing added, nothing taken away - let the grapes do what they will.  No pretense here, just light, fresh wine that marries beautifully with the local cuisine of fresh vegetables, fritto misto, fish and of course, pesto alla Genovese! 


Here is the official DOP Pesto alla  Genovese from the Consorzio del Pesto Genovese:

Ingredients: 
Genoese basil - 70 grams, preferably young and fresh.
Grated Cheese - 50 grams  Parmigiano Reggiano DOP (preferably aged 36 months) and 10 grams of Pecorino DOP (preferably aged 15 months)
Garlic - 3 cloves (preferably Vessalico)
Pine nuts - 1 tablespoon of nuts from the Mediterranean 
Ligurian Extra Virgin Olive Oil - 3 Tablespoons
Coarse Sea Salt - a few grains

Preparation:
-Wash the basil in cold water and set aside to dry on a towel.

-In the mortar, crush the cloves of garlic with a few grains of salt until the garlic has softened. Begin adding basil leaves (but don't add all at once!) The essential oils of basil are stored in the veins of the leaves. For the best taste, you must be careful not to tear or shear the leaves. Use a gentle circular motion, slowly crush the basil by moving the pestle around the edges of the mortar. The consorzio allows for a food processor, but it must be down quickly so that the heat does not oxidize the pesto.

-When you notice a bright green liquid being drawn from the leaves, it is time to add the pine nuts.
Once softened, add the cheeses, and finally the olive oil in a very thin stream.

-Preparation should take place at room temperature and the sauce should be served immediately to avoid oxidation. So pour it over the pasta, possibly linguine or strozza preti, and enjoy!

Also from Liguria: Bringing the Cinque Terre to Swirl

Tajarin, The Most Decadent Pasta I've Ever Made, Eater or Served!

Beth Ribblett


In doing research for our upcoming trip to Piemonte, it's not surprising that I've come across many recipes that feature their most prized food, the aromatic and highly flavorful white truffle.  And since Barolo is definitely one of our favorite wines on earth, I decided that I needed to cook something from the region for our annual staff dinner and ran across this decadent recipe from Lidia Bastianich.

The problem was in getting a truffle in a very short amount of time that I could use for the dish.  After a few days of  phone calls, texts and internet searches, our friend Jeff Talbot over at Ancora came through with a nice chunk of black truffle.  Although the recipe called for the traditional white truffle from Alba (upwards of $2000 per lb!) I figure the black truffle at half the price would have a similar, although not nearly as flavorful, effect.

Tajarin is different from regular pasta in the amount of egg yolks used that give it a beautiful saffron yellow color.  It is a handcut pasta that takes some time to make, but if you are going to the trouble of fresh truffles, why not?  I used the best ingredients possible - fresh organic egg yolks, Panini organic Parmigiano and the best butter ever made, the Delitia Burro di Parma.  How can you go wrong?

We served the 2008 Einaudi Barolo Terlo that was not nearly ready to drink but was still beautiful with the rich, butter ladden dish!  


For the Pasta
The black truffle from Jeff at Ancora
2 cups all-purpose flour, plus more for working
9 large egg yolks, (about 2/3 cup)
2 tablespoons extra-virgin olive oil
3 tablespoons water, plus more as needed

For cooking and dressing the pasta
1 tablespoon Coarse sea salt, or kosher salt
½ pound butter, (2 sticks)
1 ounce white truffle butter, or more, brushed cleans
1 cup Grana Padano, or Parmigiano-Reggiano, freshly grated
Equipment
Pasta-Rolling Machine;

Directions
To mix the tajarin dough, put the 2 cups flour in the food processor, fitted with the metal blade, and process for a few seconds to aerate. Mix together the egg yolks, olive oil and 3 tablespoons water in a measuring cup or other spouted container. Start the food processor running and pour in the liquids through the feed tube (scrape in all the drippings). Process for 30 to 40 seconds until a dough forms and gathers on the blade. If the dough does not gather on the blade or process easily, it is too wet or too dry. Feel the dough, then work in either more flour or ice water, in small amounts, using the machine or kneading by hand. 

Turn the dough out on a lightly floured surface and knead by hand for a minute until it's smooth, soft and stretchy. Press it into a disk, wrap well in plastic wrap and let rest at room temperature for a half hour. (Refrigerate the dough for up to a day or freeze it for a month or more. Defrost in the refrigerator and return to room temperature before rolling.) 

Cut the dough in 4 equal pieces. Keeping the dough lightly floured, roll each piece through a pasta machine at progressively narrower settings into sheets that are 5-inches wide (or as wide as your machine allows) and 20-inches or longer. Cut each strip crosswise in three shorter rectangles, each about 7-inches long. 

Flour each of these rectangles and roll them up the long way, into a loose cylinder, like a fat cigar. With a sharp knife, cut cleanly through the rolled dough crosswise at 1/8 to 1/4-inch intervals. Shake and unroll the cut pieces, opening them into tajarin ribbons, each about 7-inches long and 1/4-inch wide. Dust them liberally with flour and set them on a floured towel or tray. 

To cook the tajarin, bring to the boil 6 quarts of water with the tablespoon salt. Meanwhile, melt the butter in the large skillet and dilute it with 1/3 cup of the hot pasta water. Heat until barely simmering. 

When the water is at a rolling boil, shake the tajarin in a colander to remove excess flour and drop them all at once into the pot. Stir well to separate the ribbons and bring back to the boil. Cook for only a minute or until the pasta is just al dente, then lift it from the water with a spider, drain briefly, and drop it into the skillet. 

Over low heat toss the tajarin until well coated with butter. Turn off the heat and toss in half the grated cheese. Shave coin-sized flakes of truffle-using half the piece-over the pasta and toss in. 

Heap individual portions of pasta into warm bowls. Quickly shave the remaining truffle, in equal shares, on top of each mound of tajarin and serve immediately.


Semplice, Italian Fast Food!

Beth Ribblett

Real Parmigiano-Reggiano, not the dried fuzzy stuff you sprinkle from a can, is an amazing cheese. Following the strictest guidelines from the Consorzio del Formaggio it can only be made in a small area of northern Italy, a place where the soil, the climate and the geography all come together to yield a quality of milk found no where else in the world. There is nothing fast about the process of making it - it's aged for an average of 24 months, the longest of any hard cheese.  And they've used the same recipe for the last 9 centuries...

Our friends over a St. James Cheese have been bringing fantastic selections from a few new producers and el Casey brought me a sample from Giorgio Cavero the other day to see if we were interested in carrying it. I figured the best way to put the sample to use was to cook something with it, so I designed our meal last night around this beautiful hunk of Parmigiano-Reggiano cheese and another special ingredient given to us by our friends over at Cleaver & Co.

Knowing our love for all things Italian, Seth gave us a sample of their house made bresaola to try. Bresaola is an air dried salt cured beef from Lombardia that has been aged 2-3 months until it turns a deep reddish brown color. It has a musty sort of sweet aroma and is seasoned with a dry rub of coarse salt and spices like juniper berries, cinnamon and nutmeg. And besides eating it thinly sliced on a charcuterie plate, there is a classic Italian salad that involves bresaola and, of course, parmigiano cheese...

So it's Saturday night, we have a big MS training ride tomorrow and what better excuse to make a light, quick pasta and salad? I have the perfect, fresh, high quality ingredients for 2 Italian dishes, Insalata di Bresaola and Spaghetti al Limone.

Insalata di Bresaola
This is a simple, simple classic salad served in Italy that is amazingly flavorful if you use top quality ingredients.

Two big handfuls of arugula
1/4 lb sliced Bresaola from Cleaver & Co.
A few slivers of sweet onion
Excellent quality Extra Virgin Olive Oil (I used the Terre Nere that we sell at swirl)
Fresh lemon juice
Shavings of DOP Parmigiano-Reggiano ( I used the from St. James, soon to be at swirl)

Spread your two handfuls of arugula on a flat plate, top with bresaola and onion slivers. Shave the cheese on top, as much as you want. Sprinkle salt and pepper to taste, squeeze some fresh lemon juice on top and drizzle with olive oil.  Enjoy, serves 2!

Spaghetti al Limone
I found a few Meyer lemons last week at the market that have been sitting in my fruit bowl waiting for something special to happen.  When I brought home the cheese, I knew why I had waited...

Ingredients:
1 T. coarse salt (for the pasta water)
1 gallon of water
1/2 lb. of spaghetti (I used a really nice pappardelle)
5 T. butter (we have the Parma butter from Italy at the shop made from the cream of the cow's milk used to for the cheese, amazing!)
zest of 1 lemon
1 T. fresh lemon juice
1/4 t. salt
1/4 c. chopped fresh basil leaves
1/2 c. freshly grated DOP Parmigiano-Reggiano (I used the from St. James, soon to be at swirl)
Excellent quality Extra Virgen Olive Oil (I used the Terre Nere that we sell at swirl)
Basil leaves for garnish

Heat water for the pasta. When it’s boiling, add about 2 tablespoons salt and the pasta and cook according to the package directions. Melt the butter in a pan over medium-low heat. Add the zest, juice, salt and pepper. Heat for about 1 minute. When the pasta is done, toss it into the skillet with the lemon butter, add the basil and Parmigiano-Reggiano and toss until spaghetti is evenly coated. Serve immediately, drizzled with a bit of olive oil and garnished with basil, offering extra Parmigiano-Reggiano to grate at the table.
Serves 2


- Posted using BlogPress from my iPad

Tomato Season in the South

Beth Ribblett

It's one of my favorite times of the year here in New Orleans.  No, it's not Mardi Gras or Jazz Fest, it's tomato season, when my most favorite food is in abundant supply in all shapes, forms, sizes and colors.  Our friend Mary gave us a bag full of big, ripe Creole Tomatoes this weekend and Kerry has our little garden overflowing with cherry tomatoes.

We were having a little get together last night for our group that is coming with us to Positano this year, so I decided to make use of all this beautiful fruit and make a few tomato dishes.  Both of these are so simple yet amazingly delicious. 

The first is classic tomato bruschetta, and when I say classic I mean the way the Italians make it in Italy.  There is no vinegar or onions just five simple, fresh ingredients assembled and served with good, grilled crusty bread.

Bruschetta al Pomidoro (Tomato Bruschetta)


This is a summer staple on the Amalfi coast since Campania is also the DOP of San Marzano tomatoes.  You know, those delicious, deeply flavored plum tomatoes that we are only fortunate enough to get in cans.  But a quick lesson on bruschetta; it is pronounced bru-SKE-ta and bruschetta refers to the bread, not the topping.  The best bread for bruschetta is a stale, dense loaf like a sour dough or country style bread. The bread is cut into slices, grilled, and brushed with good quality olive oil then rubbed with fresh garlic cloves.  There are many recipes you can make to top your bruschetta, but the pomidoro is a classic.

To make the topping:
-4 medium sized ripe tomatoes cut into 1/4" dice
-2 cloves of garlic minced
-10 fresh basil leaves torn into small pieces
-1/2 to 1 teaspoon coarse salt
-few turns of the pepper grinder
-a pinch or two of peperoncino
-2 tablespoons of good quality extra virgin olive oil

For the bruschetta:
-12 slices of dense, stale bread, no more than 1" thick, and about 3-4" long
-olive oil  
-1 clove of garlic cut in half

Mix the topping ingredients, stir to combine and set aside.  Using indirect heat on a grill quickly toast the bread slices until the edges get slightly dark.  Remove from heat, brush on some olive oil and rub with the clove of garlic.  Add the topping and consume immediately!


Now what to do with all of those tomatoes Kerry has been so proudly attending to?  Cherry tomatoes always make my mouth water for a classic Sicilian dish and Lidia Bastianich's recipe is tried and true. Delicious, light, fresh and very unique, this is the perfect summer pasta dish. I've fallen in love with this brand of dried pasta called Cipriana that is sold at the Fresh Market on St. Charles and now use it anytime I'm not making fresh

Pesto Trapanese 
From Lidia's Italy

Serves 4 to 6

¾ pound (about 2-1/2 cups) cherry tomatoes, very ripe and sweet
12 large fresh basil leaves
1/3 cup of whole almonds, lightly toasted
1 plump garlic clove, crushed and peeled
1/4 teaspoon peperoncino or to taste
½ teaspoon coarse sea salt or kosher salt, or to taste, plus more for the pasta
½ cup extra-virgin olive oil
1 pound spaghetti
½ cup freshly grated Parmigiano-Reggiano or Grana Padano

Recommended equipment:
A blender (my preference) or a food processor
A pot for cooking the spaghetti

Rinse the cherry tomatoes and pat them dry. Rinse the basil leaves and pat dry.

Drop the tomatoes into the blender jar or food processor bowl followed by the garlic clove, the almonds, basil leaves, peperoncino and ½ tsp salt. Blend for a minute or more to a fine purée; scrape down the bowl and blend again if any large bits or pieces have survived.

With the machine still running, pour in the olive oil in a steady stream, emulsifying the purée into a thick pesto. Taste and adjust seasoning. (If you’re going dress the pasta within a couple of hours, leave the pesto at room temperature. Refrigerate if for longer storage, up to 2 days, but let it return to room temperature before cooking the pasta.

To cook the spaghetti, heat 6 quarts of water, with 1 tablespoon salt, to the boil in the large pot. Scrape all the pesto into a big warm bowl.

Cook the spaghetti al dente, lift it from the cooking pot, drain briefly, and drop onto the pesto. Toss quickly to coat the spaghetti, sprinkle the cheese all over, and toss again. Serve immediately in warm bowls.

Roasted Tomato and Fresh Mozzarella Pasta Salad

Beth Ribblett


With tomato season in full swing right now, I just can't get enough.  I eat them daily; sliced raw, chunked in salads, chopped on bruschetta, cooked into sauces and one of my favorite ways, roasted.  It is such a simple but flavorful way to prepare tomatoes and once roasted you can refrigerate them for about a week and use them as toppings on pizza, crostini, sandwiches, pasta, really to anything you would normally use the fresh ones for.  And the great thing about this pasta salad that I served cold yesterday, we can warm up the leftovers for dinner tonight with a little parmigiano cheese thrown on top.

Roasting tomatoes is really simple and the key to them not drying and shriveling up is using a good amount of olive oil. Once prepped you slide them in the oven and wait for the wonderful aromas of roasting herbs and garlic to fill up your house for the next two hours!  The end result in amazing and I suggest you make extra to keep in the frig to top off your favorite savory foods.

Ingredients
50-60 ripe cherry or grape tomatoes
1/2 C. olive oil
4 cloves of garlic minced
2 T. fresh rosemary chopped fine
2 T. fresh oregano
2 T. fresh thyme
Salt & pepper
1 t. pepperoncini (optional)
1 lb. dried pasta - rigatoni, bow-tie or penne work great
8 oz. fresh mozzarella
10-12 fresh basil leaves

Preheat your oven to 200 degrees.  Line a baking sheet with parchment paper or a silicon mat.  Cut your tomatoes in half and line them up on the baking sheet.  Drizzle entire pan with olive oil, be sure that each tomato gets doused. Sprinkle the garlic, herbs, salt, pepper and pepperoncini over the tomatoes, put in the oven and roast, turning the tomatoes over once after about an hour.


After two hours remove your pan and put a big pot of water on to boil.  Cook your pasta according to instructions and drain when finished.  Let the pasta cool, mixing in a little olive oil to keep it from sticking. 

In the meantime, shred your mozzarella by simply pulling it apart by hand and finely chop the basil.  Once the pasta and tomatoes have cooled, add it all together with your remaining ingredients, add salt and pepper to taste.  Simple and really good!


True Italian Lasagna

Beth Ribblett


Lasagna in Italy, not the cheesy, saucy stuff we make here in the US, is a very involved process.  It all starts with a soffritto, followed by a meat ragu and if you REALLY like the people you are cooking for, you make the pasta.  It is the only way to achieve the thin, thin layers that melt in your mouth and help give the lasagna its light texture.  But it is a labor of love that takes patience and proper timing.

The first time I had this amazing dish was in Tuscany last year on our wine and food tour.  Antonio's sister knows an Italian nonna who is in her 80's and makes the best lasagna you've ever eaten.  She made us two big pans that arrived at our villa still warm from the oven, and we served outside in the garden with some delicious Cortona red wines.  It takes her 2 days to make it, and now having done it myself, I know why.

I've been doing a series of posts on the recipes for the soffritto, the ragu, the pasta and the besciamella; now it's time to put it all together!  It's best to make this over a two day period....the links to the recipes are highlighted in orange below.

First Day
Step One:  Make the Soffritto
Like the Holy Trinity of New Orleans cuisine, a "soffritto" is the starting point for many Italian soups, sauces and stews. While locally we use equal parts onion, celery and green peppers, in Italy the base is usually a combination of carrots, onion and celery with the proportions of each depending on what you are cooking.

To begin to make the meat ragu, I first need the soffritto.  Using the recipe in Frances Mayes new Tuscan Sun cookbook, I began the long journey to tomorrow's lasagna!


First Day

Step Two:  Make the Ragu
Every cook in Italy has their own ragu recipe, variations on a theme of ground mixed meats, tomatoes, soffritto, herbs and spices.  But one thing that remains constant is the love and care that goes in to making the perfect ragu.  I don't claim to have achieved it yet, but I've learned a few tricks along the way that have helped me get a wonderfully flavorful sauce that can be used in many dishes.  I like to make a big pot, use some and freeze the rest for a quick tagliatelle on a busy day.

Second Day
Step Three:  Make the Dough
I have two pasta dough recipes that I use on a regular basis, one is from Lidia Bastianich, the other is from Francis Mayes.  I like them both equally as much, but when I made the lasagna I used Frances Mayes and I thought the texture and pliability of this dough was ideal for achieving the thin sheets needed for this dish.  The ingredients vary ever so slightly and the process is the same.  I use a kitchen aid mixer for the initial blending, kneed the dough by hand and after it has rested I use the pasta attachment for my mixer to roll the sheets. In this post I'll take you to the point where the dough is resting, before you roll it.

Second Day
Step Four:  Make the Besciamella
So your dough is currently resting and you have time to make your besciamella before we start assembling the dish.  Either of these recipes will give you the desired affect of adding a wonderful creaminess to your layers of lasagna, read through them both and decide what you have the energy for!

Step Five:  Assembling the Lasagana


Remaining Ingredients
-1 lb fresh egg pasta dough resting
-5 oz. Parmesan cheese, grated
-2-5 oz. balls of mozzarella
-a handful of fresh sage leaves
-olive oil


-Preheat you oven to 350 degrees F and butter a large baking dish. Put a big pot of salted water with a good glug of oil on the stove for the pasta.

-Reheat your  ragu and put keep your white sauce on the stove at a very low heat,  to keep it warm and make it easier to work with.

-Roll out your pasta dough
Rolling the dough with a pasta machine (I used the Kitchen Aid attachments). Cut the ball of dough into 6 equal pieces. Shape each piece into a rectangle about 5x3 inches. Lightly flour the pasta rectangles and cover them with a kitchen towel. Set the rollers of the pasta machine to the widest setting. Pass one of the pasta rectangles through the rollers long side first, then pass it though the rollers a second time. Keep the dough lightly floured-just enough to prevent if from sticking to the rollers. Reduce the width by one setting and pass the piece of dough through the rollers again. Support the dough with your hand as it comes through the rollers-don't pull it though, or the dough will shrink so it is narrower than the width of the rollers.


Continue working with the piece of dough and reducing the width one setting each time until the dough has been passed through to the proper setting. (Each pasta machine is different. I finish with the next to the thinnest one);You want to roll out strips of pasta that are about 3 x 10 inches depending on the size of your pan. I made mine a little longer and wider to accommodate the round shape of my pan.  Always keep the pieces of dough that aren't being rolled covered with a towel. If you find the dough is very elastic, let all pieces rest for 5 to 10 minutes before continuing.

When you have rolled one of your pieces of dough into the correct size, blanch 2 strips at a time in the boiling water and cover the bottom of the baking dish with pasta strips, letting them hang over the edges.  Put down a layer of meat sauce, then some white sauce and a sprinkling of fresh Parmesan.  Roll and blanch another piece of dough and continue to repeat the process until you run out of ragu. But keep back enough white sauce for a final layer on top.


Fold the over the pasta ends from the edges and top with the white remaining sauce. Sprinkle with Parmesan, tear the mozzarella over the top, scatter your sage leaves and drizzle with olive oil. Bake in the preheated over for 45 minutes or so until golden.


Prepare to "wow" your friends and family...

All of this effort deserved a fine wine so we opened a gorgeous 2001 Castelgiocondo Brunello di Montalcino signed by the Marchesi di Frescobaldi himself when he was in the shop one day way back when...

Next Step, Tuscan Ragu

Beth Ribblett

Step 1: Make the soffritto 
Step 2:  Make the ragu


True Italian Lasagna, not the cheesy, saucy stuff we make here in the US, is a very involved process.  It all starts with a soffritto, followed by a meat ragu.

Every cook in Italy has their own ragu recipe, variations on a theme of ground mixed meats, tomatoes, soffritto, herbs and spices.  But one thing that remains constant is the love and care that goes in to making the perfect ragu.  I don't claim to have achieved it yet, but I've learned a few tricks along the way that have helped me get a wonderfully flavorful sauce that can be used in many dishes.  I like to make a big pot, use some and freeze the rest for a quick tagliatelle on a busy day.

They key, as in all good recipes, is the freshness and quality of the ingredients.  Three types of meat give you a more complex flavor and if possible have the butcher grind the meat for you fresh so that you really know what is in that package.  Fresh tomatoes are ideal but a can of San Marzanos can give excellent results. I did a combination of both here and am really happy with the outcome.  Dried herbs will work but again, fresh is best!
 
Use a 6 Qt. pot for this, it will give you plenty of room to brown the meat.  One of the things I've learned along the way by reading over many, many recipes from Italian chefs and home cooks, is how to achieve the proper texture of the meat.  If you notice when you eat ragu in Italy it is not chunky, the meat doesn't glob together, the vegetables are chopped finely, giving the sauce a smooth, light texture.  So you'll need a wooden spoon and a lot of patience to achieve this and I'll explain below when we get to the step.

The ingredient list, with a few minor changes, is Guisi’s Ragu from The Tuscan Sun Cookbook by Frances Mayes and her husband Edward Mayes. I've listed my changes and her originals.  This recipe will give you enough ragu for the lasagna as well a quite a bit to freeze for later.  If you are making the lasagna, I recommend you prepare the ragu the day before as it takes about 4 hours.

Serves 10

3 tablespoons extra-virgin olive oil
1 pound ground lean beef
1 pound ground veal (Mayes uses pork)
2 large links of sausage, casings removed.  I found a delicious duck and pork at Rouses with no additives or preservatives.  (Mayes uses Italian sausages, and Terranova's would be perfect)
1 teaspoon salt
½ teaspoon pepper
2 teaspoons fresh thyme leaves or 1 teaspoon dried
1 to 2 cups red wine
1 cup soffritto (recipe below)
2 tablespoons tomato paste
8 whole tomatoes finely chopped, 1-28oz can of San Marzano tomatoes, finely chopped.  Mayes calls for16 to 20 tomatoes or 2 28-ounce cans whole tomatoes, juice included, chopped

Pour the olive oil into a 6-quart heavy pot with a lid. Next, add all the ground meat to the pot. Here is where the most work is involved. Using a large wooden spoon keep breaking up the meat into smaller and smaller pieces as it cooks. Do not brown it too much or dry out. Don’t let it sit in the hot shortening on the bottom of the pot and sear. Keep moving it around; it should just lose its color. Keep working on the meat and keep breaking it up into smaller and smaller pieces. It should also begin to smell wonderful.

When the meat has lost all its pink color and is reduced to minuscule bits (10-12 minutes), add the salt, pepper, thyme, and 1 cup of the red wine. After the wine has cooked into the meat, about 10 minutes, add the soffritto, and stir in the tomato paste and tomatoes.

Bring the sauce to a boil, and then lower to a quiet simmer. Partially cover, and continue cooking for 3 hours, stirring now and then. Along the way, add the remaining cup of wine if you think the sauce is too dense.


Simple Lemon and Garlic Pasta

Beth Ribblett


 Often working until 8 or 9pm, dinner during the week is usually a late night affair.  Needless to say we keep our cooking simple on those nights, things we can quickly throw together for a healthy, balanced meal.  Standard fare is Kerry's simply fried, fresh Gulf fish, or my Gambas al Ajillo (Shrimp with Garlic) with a big salad and pasta.  The other night I made one of my favorite, quick pasta dishes with lots of lemon and garlic.  It is so simple yet so good, I think I need to make it again this week!  I paired it with the 2010 Paco & Lola Albarino, wonderful!

Serves 2
Ingredients:
3 T. Extra Virgin Olive Oil
1 T. Butter
2-3 Cloves of garlic
Big pinch of pepperincino
Zest of one lemon ( I used a small meyer lemon)
Juice of 1/2 lemon
1/4 - 1/3 cup of dry white wine (I used whatever remained in my glass...)
2-3 T. Fresh chopped parsley (we got beautiful parsley in our Hollygrove Box)
1/2 lb. angel hair pasta (I like angel hair best with this recipe, but was out so I used spaghetti)
1/2 Cup grated Piave Cheese (can sub parmigiano)

Salt and pepper to taste

-Put a large pot of water on to boil.  Just before it reaches it's boiling point, take a large skillet and put on medium high heat.  Once skillet is warm, and olive oil and butter and heat until they begin to bubble.  Throw in garlic, lower heat to medium.  When garlic begins to sizzle, add pepperincino; stir to keep garlic from burning.
-Put pasta in boiling water and start timer. Angel hair pasta cooks quickly, in 3-4 minutes
-As garlic softens and begins to turn golden, add lemon zest, lemon juice and wine.  Bring sauce to a fast simmer for a minute or two to cook off the alcohol.  Add chopped parsley and a few pinches of salt.
-Pasta should be ready to drain and then immediately add to skillet with sauce.  Mix to allow sauce to coat the pasta, add a little of the cheese and then salt and pepper to taste.
-Plate, top with a little more cheese and smile :)

Ricotta Gnocchi with Sherried Mushroom Sauce

Beth Ribblett


I've always liked gnocchi, but never loved gnocchi until I had it at La Grotta, just off of the main piazza in Cortona, Italy.  The reason for my change of heart I'm sure has something to do with the fact that I was in a great little trattoria in one of my favorite hill towns with a very special group of people, but it also had to do with the style of gnocchi served at the table.

Tuscan Gnudi Gnocchi (photo from DaVinci Cookbook
People are most familiar with the more dense, chewy gnocchi made with russet potatoes.  But the term gnocchi comes from the word gnocco (pronounced neeocco) which means dumpling, and they can be made many ways. Because just like most of Italian cooking, these delicious lumps do not just vary from region to region, but from household to household as well, depending upon what is available. Besides the popular potato gnocchi there is the “semolina gnocchi” from Rome, topped with cheese and baked, gnocchi di panne from Friuli that is made with bread crumbs, and the gnoochi gnudi from Tuscany made from ricotta cheese and spinach.

Semolina Gnocchi (photo from lindaraxa)
 It is this Tuscan style gnudi that made me fall in love with gnoochi.  Soft, fluffy and light as air these creamy pillows are usually served in Tuscany with simple tomato sauce and are just heaven on a fork.  I've been inspired to have a go at making them, but decided to start with an even simpler version of gnudi that is made with just ricotta, flour, eggs and cheese.


The key to making these gnoochi successfully to me is good ricotta cheese.  We are fortunate that our friends over at St. James Cheese carry handmade ricotta from Caseficio Gioia in California by Vito Girardi, a third generation cheese maker from Puglia whose grandfather was one of the first makers of burrata. Ricotta is a simple fresh cheese, but flavorful and adaptable to many savory and sweet recipes. I just love the richness of this, it's the real deal! Pure white, a little nutty, slightly sweet with a fluffy, dry texture. Trust me, you will never go back to the store brands.  But call St. James before you go over, they don't always have it on hand.

The first step in this recipe starts the day before because even with this dry style of ricotta, you need to drain any excess water out of it over night.  This is especially important if you are using the more common store bought brand.  It is simple, just line a strainer with a coffee filter, put the cheese in the filter, set the strainer over a bowl, cover with plastic wrap and refrigerate overnight.


Ok, so you've drained your ricotta overnight and are ready to make some Gnudi Gnoochi!  The best is to make these just before you are going to eat them

The gnocchi (from Lidia Bastianich):
*1 1/2 pounds fresh ricotta cheese or 3 cups packed whole-milk ricotta cheese drained overnight
*1 3/4 teaspoons salt, plus more for the pasta water
*2 large eggs
*1/2 cup freshly grated  Piave cheese
(the recipe calls for Parmigiano-Reggiano, but we always have piave at the shop...)
*1/2 teaspoon freshly ground white pepper
*1/4 teaspoon ground nutmeg, preferably freshly grated
*1-2 cups all-purpose flour, or as needed, plus more for forming the gnocchi (I know this sounds a little vague, but the amount of flour will depend greatly on dryness of the ricotta)

1. Bring 6 quarts of salted water to a boil in an 8-quart pot over high heat.

2. Turn the drained ricotta into mixing bowl. Beat the eggs and 1 teaspoon salt
in a separate bowl until foamy. Stir the eggs, 1/2 cup grated cheese, pepper, and nutmeg into the ricotta with a wooden spoon or spatula until thoroughly blended. 

3. Add 1/2 cup of flour to the bowl and stir. Continue to add flour (a little at a time) until the dough comes together (will be fairly sticky).  Using a spoon, scoop a small bit of dough (about 1 teaspoon) and drop it into the boiling water.  If the gnocchi holds it’s shape, then you have added just the right amount of flour.  If you see bits shedding off of the gnocchi, then you need to add more flour to the dough.  Stir in a bit more flour and repeat the testing process above till your gnocchi holds together.
 
4. Flour your hands, the work surface, and the dough lightly, as necessary, to prevent the dough from sticking. Divide the dough into six approximately equal pieces. Roll one of the dough pieces out with a back-and-forth movement of your palms and fingers to a rope about 1/2 inch wide.  

5. Cut the roll crosswise into 1/2-inch lengths. Repeat with the remaining dough. Dust the cut gnocchi lightly with flour and toss them gently to separate. Let them stand while preparing the sauce.

*At this point you can freeze some of the gnocchi.  I used half for the recipe and froze the rest for later!  When you are ready to use the frozen gnocchi, you don't need to thaw them, just put them right in the boiling water.

The mushroom sauce: 
*2 tablespoons butter
*2 tablespoons olive oil
*12 oz. shiitake mushrooms, cleaned, stemmed and sliced
*1/2 cup sliced shallots
*1 1/2 cup chicken stock
*1/4 cup good quality sherry
*1 tablespoon chopped fresh sage
*2 tablespoons heavy cream
*Kosher salt
*Freshly ground black pepper
*3 cups coarsely chopped arugula
*Grated Piave cheese

1. Warm butter and olive oil in a large skillet over medium high heat.  Cook just until the butter begins to brown (about 2 minutes).  

2. Add sliced shiitakes and shallots and cook, stirring occasionally, until golden brown (about 10 minutes).  Add stock, sherry and sage, stirring to combine.  Simmer until liquid is slightly reduced (about 6 – 8 minutes).  Stir in heavy cream, then season to taste with kosher salt and freshly ground black pepper.  Reduce heat to low to keep sauce warm while gnocchi are cooking.

3. Working in small batches (about 10 gnocchi at a time depending on size), drop gnocchi into the boiling, salted water.  When the gnocchi rise to the surface, scoop out with a slotted spoon and add to the skillet with the mushroom sauce.  Repeat until all gnocchi are cooked.

4. Return heat to medium, add chopped arugula and toss.  Cook until arugula is wilted and everything is nicely heated through (about 1 minute).  Finish with a healthy dusting of freshly grated Piave cheese.


Savory Pumpkin Ravioli in Sage and Butter

Beth Ribblett

I managed to get out of town for a few days this weekend and took a quick trip to visit my family in Pennsylvania.  The cool fall weather and changing leaves have been a refreshing change from the still way to hot temperatures in New Orleans!  I always like to cook something special when I'm here and the abundance of autumn veggies and gourds inspired me to make homemade Pumpkin Ravioli.  My sous chef Rika and I spent the afternoon on Sunday making fresh pasta and while they weren't too sure about pumpkin and sage together, the meal was a hit even with the most picky eaters.

My standard fresh pasta recipe is Lidia Bastianich's from her book Lidia's Italian Table. It is simple, delicate and comes out perfect every time I've made it. I use my Kitchen Aid Mixer or the initial blending and then add the pasta roller attachments  when it is time to roll it out. When possible, I like to use farm fresh eggs (the fresher the better) that we buy at the Crescent City Farmer's Market. Click here for my step by step instructions for making fresh pasta, Pasta all'Uovo, Basic Egg Pasta.


Once you have gotten to the point in the dough recipe where you "Roll the dough into a smooth ball. Place the dough in a small bowl and cover with plastic wrap. Let the dough rest for at least 1 hour at room temperature, or up to 1 day in the refrigerator, before rolling and shaping the pasta. If the dough has been refrigerated, let it stand at room temperature for at least 1 hour before rolling and shaping.", you can now make the filling while the dough is resting.

Makes 6 generous servings

For the filling:
    16 oz. ricotta cheese (about 2 cups)
    16 oz. pumpkin puree
    1 egg
    1 teaspoon Kosher salt
    Freshly grated nutmeg

For the sauce (to dress about 1/3 of the ravioli):
    1 stick unsalted butter
    20 sage leaves (plus additional for garnish, if desired)
    Handful Almond Slivers
   1/4 cup pine nuts
    Kosher salt
    Parmesan shavings

 While the pasta dough rests, combine the ricotta, pumpkin, egg, Kosher salt, and some freshly ground nutmeg in a mixing bowl. Set aside. Line a baking sheet with parchment or a silicon mat and lightly flour.

 Once the dough has rested, use a pasta machine to roll the pasta out into thin, wide sheets. I did not have my ravioli mold with me, so we used a juice glass for round ravioli.  I like to lightly mark the pasta sheets with the glass before I spoon on the filling.  Place spoons of the filling in the circles on the dough, and using a small brush, lightly dampen the edges with water to help seal.  Top with another sheet of pasta dough.  Using the glass, press down through both sheets to cut, pinch the edges with your fingers, dust with flour and place on the baking sheet.  At this point you can cover with plastic wrap and store in the refrigerator for up to a day before you do the final steps.

The pine nuts and almonds are a garnish and need to be roasted/toasted until they darken slightly, be careful not to burn them.  Once you've done this, grind about 2/3 of the mixture, leaving the other third whole, combine the two and set aside until you're ready to garnish.

To prepare the ravioli, bring a large pot of salted water to a boil. Boil for about 5 minutes, in batches, pushing the ravioli back down into the boiling water with a wooden spoon as it floats to the top.  Drain the ravioli and set aside.

Meanwhile, brown the butter in a large skillet.  Add the sage and cook for a few extra minutes. Transfer the ravioli to the pan and toss gently in the sauce.  Serve immediately topped with the nut mixture and some shaved Parmesan cheese.

Pasta with Fresh Lemon, Cream and Chanterelles

Beth Ribblett


I saw a recipe in Lidia Bastianich's cookbook and have just been waiting for the right opportunity to make it.  Hers uses lemon juice and zest with rich heavy cream with a fresh tagliatelle pasta.  But when I was shopping at the Hollygrove Market yesterday I got one of the few remaining bags freshly foraged chanterelles and decided they would be perfect addition to her recipe.  Not to mention they had a few pints left of the to-die-for Rocking R Dairy fresh cream, making my decision even easier.


Today was a long bike ride for us, so there was no time for fresh pasta. But I find the next best thing is the Bionaturae brand of egg pasta, and we just happened to have a package of the papparedelle in the pantry.

Ingredients
    * 3 tablespoons butter
    * 4 teaspoons Lemon zest, finely grated (about 2 lemons)
    * 1 teaspoons salt (her recipe calls for 2t, use 1t and then adjust)
    * 1 cup dry white wine
    * 1 cup chanterelles, slice the big ones vertically into strips
    * 1 cup heavy cream
    * ⅓ cup lemon juice, freshly squeezed (about 2 lemons)
    * 1 pound tagliatelle or pappardelle
    * 1 cup pecorino, freshly grated, plus more for passing
    * extra-virgin olive oil, best quality, for serving

Servings: This recipe yields 6 servings.

Directions

Put your pot of water for the pasta on the stove and begin to bring it to a boil. As you are waiting for your water, begin the recipe.

Drop the butter into the big skillet, and set it over medium heat. As the butter melts, scatter in the grated lemon zest; stir it around until sizzling. Add the chanterelles and gently stir them to coat with with butter. Pour in the white wine and lemon juice, add the salt, stir, and bring the liquids to a bubbling simmer. Cover the skillet, and let cook for a couple of minutes.

Uncover the pan, and slowly pour in the cream, whisking it steadily into the simmering wine and lemon juice. Cook, stirring occasionally, until the liquids reduce to a saucy consistency you like, 2 or 3 minutes more.

After whisking in the cream, start cooking the pasta until al dente. This about 4 minutes for fresh pasta or the bionaturae pasta.

With the lemon-and-cream sauce at a simmer, taste for seasoning and add salt if needed.  Remember that your cheese will add some salt as well.  As soon as the pasta has finished cooking, quickly lift out with tongs and drop it all into the skillet. Toss the pasta until well coated, loosening the sauce with a few spoonfuls of hot pasta- cooking water if needed.

Turn off the heat, sprinkle a cup or so of grated cheese over the linguine, and toss well. Finish with a drizzle of olive oil, toss again, and heap the pasta in warm bowls. Serve immediately, with more cheese at the table.

Cooking Like Locals

Beth Ribblett


One of the things we really enjoyed about our recent trip to Italy was cooking the local fare at our villa using only the freshest ingredients as all good Italians do.  On the Amalfi Coast seafood is king and you eat in every which way from raw to marinated, grilled or stewed, it is the star of every meal.  So much so that we got a little meat craving one night and decided to cook at home.

Enoteca Cuomo, one of our favorite stops.
 Not wanting to do anything that would take too much time, we stopped at Enoteca Cuomo on our walk up from one of our forays to da Adolfo.  They sell many different cuts of meats and meat products, so we opted for their house made sausage and also some parmigiano cheese and a few bottles of wine.  Next stop was the alimentari (small neighborhood grocery) where we picked up fresh veggies for our insalata and some locally made pasta.

Fresh veggies brought in daily at the alimentari
Now for the most important ingredients we had to look no further than the garden at the villa.  Chiara and Giuseppe, the wonderful owners, have a beautiful vegetable garden that they allowed us to pick from for our meals. We gathered up fresh San Marzano tomatoes, lots of basil, lemons and lemon leaves for the meat preparation.  I had decided to try to make a version of a typical southern Italian dish, meatballs wrapped in lemon leaves. I didn't have a recipe, but kind of pieced on together from different versions I found and was very happy with the results.

San Marzano tomatoes in the garden
One of many lemon trees in the garden
One of the things that made this work was the simplicity of the sausage; it was only pork, white wine, salt and white pepper, so I'm not exactly sure how it would be with our version of Italian sausage, but it is definetly worth trying to find out!  Also, since I didn't have a recipe, these are not exact measurements, but it would be pretty hard to mess up if you follow what I did...


I also made a fresh tomato sauce using one of Lidia Bastianich's tried and true recipes that was absolutely delicious and very quick once you peeled the tomatoes.  This recipe will follow the meatballs.

Meatballs on Lemon Leaves
Serves 6

Ingredients
2lbs Pork Sausage casing removed
1 egg lightly beaten
2 1/2 handfuls of plain breadcrumbs (I grated some day old ciabatta bread we had left over)
Grated peel of 1 lemon
1-1/2 handfuls of grated parmigiano cheese
salt & pepper
2 T. chopped parsley
24 lemon leaves washed and dried completely
olive oil

-Pre-heat over to 350 degrees
-Combine sausage, egg, bread crumbs, lemon peel, cheese and parsley, mix with your hands until everything is well incorporated.
-Heat a little olive oil in a pan and make a small patty to test for seasoning (the amount of salt you add will depend on the saltiness of your cheese and sausage).  Quickly fry it, taste and adjust accordingly.
-Roll the mixture into small cigar shaped patties, wrap with a lemon leaf and secure with a toothpick.
-Brush the leaves with olive oil and put on a baking sheet.
-Bake for 20-30 minutes, check at 20, you want the meat to be moist but not pink.

Fresh Marinara Sauce
Serves 6

1/4 cup extra virgin olive oil
8 garlic cloves, peeled
3 pounds ripe fresh plum tomatoes, peeled and seeded (click here for instructions on peeling fresh tomatoes), or one 35 ounce can Italian plum tomatoes (preferably San Marzano), seeded and lightly crushed, with their liquid
Salt
Crushed red pepper
10 fresh basil leaves, torn into small pieces
Parmigiano cheese for garnish
1lb cooked pasta

-Heat the oil in a 2- to 3-quart nonreactive saucepan over medium heat. Whack the garlic cloves with the flat side of a knife, add it to the oil, and cook until lightly browned, about 2 minutes.
-Carefully slide tomatoes and their liquid into the oil. Bring to a boil, and season lightly with salt and crushed red pepper. Lower the heat so sauce is at a lively simmer, and cook, breaking up tomatoes with a whisk or spoon, until sauce is chunky and thick, about 20 minutes.
-Stir in the basil about 5 minutes before sauce is finished. Taste sauce, and season with salt and red pepper if necessary.

Quick Shrimp Pasta at the Beach

Beth Ribblett

Every trip to the beach for us means doing something with fresh seafood.  And of course big, beautiful Gulf shrimp are the perfect source as they are quick to prepare and pack a lot of flavor.  I made this dish with sausage at home and loved it, so I decided to try it with shrimp and pancetta here at the beach.

I had gone to the olive bar at whole foods to get somethings for a picnic that I then forgot to bring with me, so I decided to make a pasta dish around the what I had bought.  I like those new little four compartment containers they have so I filled it up with the pitted castelvetrano olives, spicy Mediterranean olives, roasted tomatoes and mozzarella balls.  I tossed these in at the end and they lots of texture and flavor to this simple dish.

Once your pasta is cooked this literally takes about 5 minutes to cook and is really delicious.  We paired it with the Librandi Ciro Rosato from Calabria and it worked beautifully

serves 4
ingredients
-1 lb dried pasta (I like the lumonconi, but you could us rigatoni, penne, orchiette or any short chunky style of pasta)
-2lbs head on Gulf shrimp, deheaded, peeled and deveined
-1 ounce pancetta diced
-3 cloves of garlic sliced thin
-dried pepperoncini
-1/2 cup chicken or fish stock
-a splash of whatever white wine or rose you are drinking with your meal
-your favorite olives and stuff from the wf olive bar - I used 2 types of olives, mozzarella balls and roasted tomatoes - about 1/2 cup each, chopped to bit sized pieces
-salt and fresh ground black pepper
-handful of fresh basil chopped
-lots of grated Parmesan cheese

directions
-cook pasta to directions on package, drain and set aside.
-add olive oil to pan and heat to medium.  Throw in pancetta until just starting to brown on the edges, and the garlic and pepperoncini, and wait til they sizzle, about 10 seconds.  Add shrimp and fry until they just begin to turn pink.  Add stock and splash of wine, increase heat until shrimp are cooked through, but be very careful not to overcook.
-add cooked pasta, toss to coat it with the juices and cook for another minute.
-remove from heat, season with salt and pepper, stir in remaining ingredients and plate immediately.

Pasta with Italian Sausage and Veggies

Beth Ribblett

With the shop being in full spring mode right now, spending lots of time in the kitchen preparing complicated dishes is on hold 'til July!  One of my quick, go-to pasta recipes that I've been making different variations of every time, is based on one of Lidia Bastianich's dishes.  A healthy, hearty one dish meal, we love it with a nice glass of red wine, but a full bodied white would work just as well.  Here's my version from this Sunday's dinner using chicken sausage for the meat plus arugula and zucchini for the veggies.  But I've made this with pork sausage and shrimp, with different veggies like kale or asparagus, basically whatever is left in the refrigerator on Sunday night!

Serves 2-3

For the Sauce:
1 large zucchini, grated
2 big handfuls of fresh arugula
2 links of Brau House Spicy Italian Chicken Sausage (Whole Foods)
4 tablespoons good olive oil
3 large cloves garlic, crushed
Salt
1/4 teaspoon hot red pepper flakes
1 to 3 tablespoons unsalted butter (optional)
1 cup or more chicken stock
Diced fresh tomatoes and a handful of chopped fresh basil for garnish

For the Pasta:
3 quarts water
1 teaspoons salt
1/2 pound orecchiette or we've been using pasta shape called "lumaconi" from WF that we love 'cause it really soaks up the sauce.

For Serving:
1 ounce or more Piave cheese, grated

Preparing the Sauce:
  • Slice the sausage and saute over moderately high heat in a tablespoon of olive oil. In a moment or two, add the crushed garlic and continue sauteing for another 2 to 3 minutes, until the sausage is lightly browned. 
  • Add another tablespoon of olive oil and toss in the arugula and zucchini. Taste, and season lightly with salt and pepper flakes. (At this point, you could start the pasta.) Cover the pan and let steam for several minutes. 
  • When the spinach has wilted, stir in the butter, then the stock and bring to a boil. Taste again for seasoning, and let cook uncovered for several minutes more to reduce and concentrate the liquid. 
  • At this point grate the cheese. Again taste and correct seasoning keep on a low simmer until the pasta is ready.
  • As soon as the pasta has cooked and drained, turn it into the hot sauce and toss gently to blend. Taste carefully for seasoning, and remove from heat. 
  • Sprinkle on half of the freshly grated cheese and the chopped basil, and toss to blend. At once, turn the pasta onto the hot platter or plates, sprinkle with the rest of the cheese and diced tomatoes, and serve.

Eat Fresh! Support Local Fishermen and Farmers

Beth Ribblett


Our trips to the local Crescent City Farmers Market, K-Jeans seafood and our own garden the past few weekends have netted in some really memorable meals. Nothing fancy, but it is amazing how good, simply prepared, ultra fresh ingredients can make for a really flavorful meal.

For example, yesterday we picked up those beautiful baby zucchini, lots of ripe red tomatoes, butter beans, freshly made cheese and milk at the CCFM, and then some gorgeous tilapia fillets at K-Jeans. We've got more cucumbers and basil coming from our garden that you can imagine, so we had lots of options for dinner!

I started with the zucchini: sliced them in half and salt and peppered them; heated a good amount of oil in a large skillet with some peperoncino and fried until lightly browned. The baby ones pack a ton of flavor, so I didn't need to add anything else!


I couldn't wait to eat those tomatoes so I chopped them and a few of our cucumbers in chunks, added a small amount of sliced onion, with a little fresh basil and oregano from the garden. Dressed simply in 1 part balsamic vinegar to 3 parts evoo, the tomatoes were deliciously sweet and the crunchy fresh cucumbers added the perfect texture.


Next I made the pesto. Kerry planted tons of basil this year and fresh pesto is a staple that we just love in the summer. I took 2 packed cups of basil, a clove of garlic, a pinch of sea salt, 3/4 cup of mainly freshly grated Parmesan cheese with a little Pecorino and 3 T. of pine nuts and threw it in the cuisinart. Pulsed until finely chopped and then slowly added in 1 cup of evoo and pulsed until oil and herb mixture are well blended. This made about 2 cups of pesto. Added freshly cooked pasta and topped with a little more cheese.

Kerry took care of the fish. She made a little lemon butter sauce with 1/2 stick melted butter whisked with 4 t. freshly squeezed lemon juice and a pinch each of cayenne pepper, salt and black pepper. She salt and peppered the fillets and dredged them in a little flour. Reheating the oil left from the zucchini fried them over med-high heat until just lightly browned. Sorry, I got to hungry to take any more pictures...

We packed our plates with veggies and pasta, added the fish with the lemon butter sauce spooned on top, and settled down to watch the first day of the Tour de France, our absolute favorite sporting event of the year! We drank a great little Italian white wine, the Vinosia Malvasia, cheered Lance on as we cleaned our plates and commented on how lucky we are to eat such great food. Everything was simple, fresh, local and delicious and we finished it all off with one of my freshly baked Biscotti Amaretti.


A great performance by Lance, and superb meal, what a perfect Saturday night!

Tagliatelle al Ragu

Beth Ribblett


One of the food blogs that I am particularly fond of is Aglio, Olio e Peperoncino written by a woman named Eleonora who lives in Rome. She did a wonderful post last year about how in Italy Sundays mean "family", and of course family means food which is similar to how I grew up with my mother always taking the time to cook a delicious Sunday dinner for all of us and inviting extended family to share the meal as well.

Eleonora describes her Sunday ritual and her mother's signature dish that for her is a weekly display of love. I've been wanting to make this ever since I read her post, but for some reason never got around to it, until this Sunday. Because for Kerry and me, Sunday means "home" as it is the only day that we don't go to the shop or spend too much time working. We go for a bike ride, Kerry works in the garden, I work on my blog and we cook a delicious meal. So this Sunday I decided it was finally time to make Eleonora's mother's classic Sunday dish, Tagilatelle al Ragu. It is still simmering away on the stove (see photo below), but I wanted to be sure to get the post done before we sat down to eat because it is divine! I'm including her full post as it is a wonderful look into the Italian way of life brought back memories of my own childhood in my mother's kitchen.


From Aglio, Olio e Peperoncino
March 22, 2009
Sundays spent satiating

"Sundays in Italy mean family. They speak of tradition, repose and morning Mass. Sundays gather the family around the table for communal weekly updates, sports events (mainly soccer) and convivial merry. As my son and I skip down the flights of stairs of our apartment building on our way out, we walk past Signora Rosetta’s door, inebriated by the smell of tomato sauce simmering on her stove. That divine perfume then wafts over and mingles with our downstairs neighbor Gina’s veal cutlets. And so forth, in a Babylon of aromas all the way down, all good, all Sunday-like.

Every Sunday lunch, my little boy E. and I go to my mother’s house, which is a 5-minute walk from our home. Wearing a nice blouse or a new pair of trousers, to honor our host, we head out. Mamma likes that kind of stuff, she also loves it when E.’s hair is combed with a tidy part on the side. A rare image, E. defines tousled. We breathe in the morning air and take a nice stroll to our favorite cafe, buy the paper, chat with people from our neighborhood. A Sunday ritual. We may go to Mass if we feel inspired, otherwise we head straight for the pasticceria (pastry shop) and pick up a tray of assorted bigné, cannoli, sfogliatelle, éclairs etc. sold by weight and wrapped in gift paper, tied with curly ribbons.

We always arrive early, at my mother’s house. That too is part of a Sunday habit. All members of the family each chip in with the housework, helping in the kitchen, airing out the bedrooms, watering the flowers on the terrace. Every time I walk in the house where I have been raised, I am immediately overcome with a warm, reassuring feeling. Back to the womb. The aroma of my mother’s cooking returns me to all my childhood memories. The incidental music of the TV broadcasting the usual Sunday shows, the smell of fresh flowers. My mother’s books, her dust, her Persian rugs. The chandeliers, the framed black and white photographs, the Steinway grand piano. It’s all there, unchanged, thank God.
And then that which she is most proud of: la tavola, her table. It is a festive occasion, and she honors it beautifully by setting an impeccable table. She always prouds in laying a crisp embroidered linen tablecloth, ironed to perfection. China plates, double glasses – for both wine and water – shiny silverware and matching fabric napkins. Mamma cooks for two days in preparation for her family feast, and she prouds in displaying her efforts. The beverages are always served in glass (and not the bulky plastic) bottles. The wine is always chosen wisely to pair the food, and there’s always an extra dessert, usually homemade.

My mother makes it a point to pick the best ingredients, priding herself in finding seasonal variations, local and organic staples. She cooks it lovingly, employing all her generosity, and enjoying the creative process. She provides for us, not merely nourishment and great tasting foods, but an on-going, weekly display of love.


For this year’s edition of 5 Minutes for Mom’s Ultimate Blog Party – my first – I will share with all participating home cooks, mothers, and daughters of great ladies before them, my mamma’s signature Sunday dish, the one she is most fond of. It his her pièce de résistance; whenever she prizes us by making it, it is in fact a party. I have watched her make homey dishes like these countless times, as I grew into the mother I am today, and never once has she or her fabulous fares disappointed me.

The authentic Italian Sunday lunch tradition lives on in my mother’s hallmark Tagliatelle al Ragù. Pull up a chair and let's eat. This recipe is a classic. It results in the creation of an intensely flavorful, rich meat sauce to serve over home made tagliatelle, and dusted with lavish amounts of grated Parmigiano Reggiano. My mother starts preparing it early in the morning and allows it to simmer, very, very slowly for many hours, at least three and ideally four.
* 3 tbsp extra virgin olive oil

* 2 tbsp unsalted butter

* 1 large carrot, finely diced

* 1 small onion, cut into same size dice as carrot

* celery stalks, cut up into same size dice as carrot and onion and in the same amount
* 650gr (1 1/2 lbs) ground beef and veal total (small variations from this weight are not significant)

* 200ml (1 cup) whole milk

* 200ml (1 cup) dry, white wine

* 1 kg (28-oz can) whole or crushed tomatoes, San Marzano would be great

* A pinch of ground nutmeg

* 300gr (3/4 lb or 1 1/2 cups) tagliatelle. If you decide to make your own homemade pasta, the outcome will be a million times better. And those eating will feel even more loved by you.

* Salt to taste

* Lots of Parmigiano, grated


It all begins with an empty, heavy-bottomed, medium to large sized pot. If you have a Dutch oven, that is ideal. Place the oil and butter into the pot and bring to medium-high heat.
Add the diced battuto (carrot, onion and celery trinity) and stir to coat well, allowing vegs to soften for about 6 minutes. Hark! Do not brown the onion or celery, they need to simply wilt.

Next, add all the ground meat to the pot. Here is where the most work is involved. Using a large wooden spoon keep breaking up the meat into smaller and smaller pieces as it cooks. Do not brown it too much or dry out. Don’t let it sit in the hot shortening on the bottom of the pot and sear. Keep moving it around; it should just lose its color. Keep working on the meat and keep breaking it up into smaller and smaller pieces. It should also begin to smell wonderful.


When the meat has lost all its pink color and is reduced to minuscule bits, pour in the milk and turn up the heat and bring to a boil. Stir well and allow the milk to completely boil away. When that happens, you should only be able to see the olive oil and butter between the meat pieces and vegetables, and no more milk. This will take about 20 minutes.

Now add the white wine and evaporate it too.

Add the tomatoes. Empty the entire can into the pot and use a wooden spoon to break up the whole tomatoes into large chunks. Season with salt and nutmeg, stir well and turn down the heat to a very gentle simmer, only the occasional plip, plop! bubble should come to the surface. Do not cover. Allow the sauce to simmer slowly for 3 to 4 hours, stirring occasionally; and to fill the rooms of your soul with warmth, love and a terrific aroma.

If you're pressed for time, or making home made pasta feels too big a task right now, you can decide over dried or fresh commercially sold tagliatelle, the only requirement is they be rough-surfaced and quite thick (at least 3 mm, 1/8-inch).

When the sauce is almost ready, bring your salted gallon of water to a rolling boil. Cook the tagliatelle, then drain them al dente, saving some starchy cooking water. Return the pasta to the empty stewpot and add about a cup of meat sauce to the cooked tagliatelle and stir well. This only colors the strands lightly, but we’re not done yet. Serve the coated tagliatelle in individual soup bowls, spooning the divine Bolognese sauce over each and dusting with copious amounts of grated Parmigiano.

Mamma uncorked two bottles of Chianti today, and the first roaring toast was to the never-ending party she throws, come Sunday at lunch."

Lisa's Birthday Dinner

Beth Ribblett

Our friend Lisa's birthday was last week and with our crazy schedule we didn't have time to do anything special for her so we decided to cook her dinner on Sunday night. Kerry wanted to serve bubbly (of course!) and I wanted to serve an Italian red (of course!) so we decided to just drink them both knowing that Lisa would be happy with whatever we opened!

As usual I had a specific wine in mind when I planned the menu. Knowing how much I love the wines and foods of the Bastianich family, our friend Monica from Neat Wines brought 2006 Bastianich Calabrone a few weeks ago. New to their portfolio, the nose alone told me I had to have it. Besides the fact that it is only released in excellent vintages, and that it is a an unusual blend of 40% Merlot, 45% Refosco, 10% Cabernet Franc, 5% Pignolo, the other thing that makes "Super Friulian" so special is the vinification process. To punch up the flavors and soften the tannins of the Refosco and Cabernet Franc they take 30% of the best clusters of the grapes and hang them in a ventilated hilltop attic for a four to eight week drying period. This appassimento process, similar to Amarone, as well as the aging for 2 years in oak and another in bottle before release, results in a truly special wine (so special it was served to the Pope during his visit to New York in 2008!). Deep red fruits, velvety texture, powerful, elegant, with some delicious spices, cocoa and espresso, notes this needs some robust food!

Enough about the wine, what about the food?? Since I've been on such pasta kick lately, I decided to make some fresh pappardelle and do a Porcini and Pancetta Cream Sauce. And what better to accompany the pasta than a big steak served Tuscan style and a nice salad with heirloom lettuces and mache.

So, the pasta; to make the pappardelle I used my usual recipe for Pasta all'Uovo. Once you roll out the sheets, cut them in half crosswise to make 10 strips about a foot long and 5" wide. Lay them out in trays, in layers, lightly floured and covered with towels. Take one of the strips, and lay it out on a floured board; dust the top with flour as well. Starting at one end, fold the sheet over on itself in thirds or quarters, creating a small rectangle with 3 or 4 layers of pasta.

With a sharp knife, cut cleanly through the folded dough crosswise in 1-1/2-inch wide strips. Separate and unfold the strips, shaking them into long noodles. Sprinkle liberally with flour so they don't stick together. Fold, cut, and unfurl all the rolled pasta sheets this way, and spread them out on a floured tray. Leave them uncovered, to air-dry at room temperature until ready to cook.


The Sauce:
Ingredients

* 3/4 cup dried porcini mushrooms
* 1-1/2 cups hot water
* 1 pound pappardelle
* 2 tablespoon olive oil
* 2 tablespoons unsalted butter
* 1-1/2 ounces pancetta
* 1/3 cup minced shallots
* 3 teaspoons minced garlic
* 1-1/2 cups heavy cream
* dash of truffle oil
* 3/4 teaspoon chopped fresh thyme
* salt
* freshly ground black pepper
* 3 tablespoons chopped fresh parsley
* 1/2 cup grated Parmigiano-Reggiano cheese

Instructions

Place the dried mushrooms in a medium bowl, cover with the hot water, and let sit until reconstituted and soft, about 15 minutes. Drain the mushrooms and their liquid through a fine mesh strainer into a clean bowl, squeezing the mushrooms to extract as much liquid as possible. Reserve the liquid and roughly chop the mushrooms. Set aside.

Bring a large pot of salted water to a boil. Have it ready to go, because the fresh pasta cooks very quickly.

Meanwhile, a little of the oil in a large skillet and brown the pancetta. Remove and drain on a paper towel. Add the rest of the oil and melt the butter in the skillet over medium heat. Add the shallots and cook, stirring, until soft and fragrant, about 2 minutes. Add the garlic and cook, stirring, until fragrant, 30 seconds. Add the chopped mushrooms, and cook, stirring, for 2 minutes. Add the reserved mushroom liquid, bring to a boil, and cook, stirring occasionally, until the liquid is nearly all evaporated, 3 to 4 minutes. Add the cream, thyme, salt, pancetta, dash of truffle oil and pepper and return to a simmer. Cook, stirring occasionally, until the cream is reduced and thick, 4 to 5 minutes. Add a few tablespoons of the cheese and the parsley and stir to incorporate.

Add the pappardelle to the boiling water and cook until al dente, 2 to 4 minutes for fresh pasta. Drain the pasta and add to the pan with the sauce, tossing well to coat. Add 2 more tablespoons of the cheese, toss, and remove from the heat. Serve immediately and use the rest of the cheese for garnish on the plates.


And the steak? My version of bistecca fiorentina, the first time we made this was with freshly cut Chianina beef steaks over an open fire in a villa in Tuscany with 8 of our close friends. Although we'll never be able to recreate that special experience, it is still one of my favorite preparations and it always take me back to that magical night.

Grill some fresh t-bones rubbed in olive oil, salt and pepper, they should be pretty rare. While the steaks are cooking, fry a big handful of fresh sage and some rosemary in a good amount of olive oil until the sage leaves are crispy.

When the steaks are done, put them on a cutting board and thinly (1/4") slice the meat of the bone. Put the meat on a serving dish and pour the hot olive oil and herb mixture over to finish cooking and seal in the juicy flavor. Salt and pepper to taste.

Buon Appetito!


Pasta for Breakfast?

Beth Ribblett


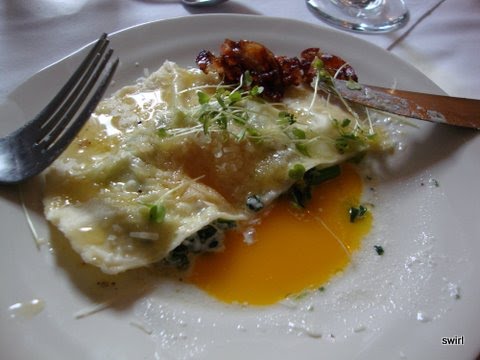
Ok, so maybe we've taken our love of pasta a bit too far this time, but when we saw this preparation on iron chef, we knew it would be perfect for our upcoming dc10 theme of "brunch". So here's the deal. We've put our own spin on the recipe and made large ravioli stuffed with the usual ricotta and herb filling, but then topped it off with a fresh egg yoke before covering it with the 2nd sheet of pasta. We boiled them, just like you do regular ravioli and then plated them drizzled in melted butter and a little pancetta. Sunnyside up with a side of bacon, Italian style!

My standard pasta recipe is Lidia Bastianich's from her book Lidia's Italian Table. It is simple, delicate and comes out perfect every time I've made it. I use my Kitchen Aid mixer for the initial blending and then add the attachments when it is time to roll it out. I use farm fresh eggs (the fresher the better) that we buy from Justin Pitts at the Crescent City Farmer's Market when possible.

Make the dough first. I've taken the time to type Lidia's recipe word for word and added photos of the steps. You will have lots of left over dough to make regular ravioli or cut it into fettuccine. Click here for Pasta all'Uovo

I did the dough, Kerry came up with filling and we assembled them together. A fun, albeit a bit stressful, Sunday morning in the kitchen... I think the dc10 brunch was our best event yet!

Serves 12

Ravioli Ingredients
2 medium shallots
10-12 oz. fresh spinach
Freshly ground black pepper
Salt
Peperoncino
1 stick butter
1 t. freshly chopped dill
fresh nutmeg
10-12 oz. fresh ricotta
12 fresh egg yokes (reserve a little of the whites to brush the edges of ravioli
6 oz. pancetta, cut 1/2" slices
Freshly grated Piave or Parmigiana-Reggiano cheese
Fresh pasta sheets, see link to recipe above


Directions
Chop shallots and saute in 1 T. of the butter with a few generous grinds of black pepper and a pinch of peperoncino. When shallots are clear, add spinach and stir until spinach is wilted. Add dill and salt to tasted. Be sure all of the water has cooked out of the spinach, but be careful not to over cook.

Transfer cooked spinach to a cutting board and let cool for a few minutes. Place ricotta in a bowl and grate a small amount of nutmeg in (to taste, and you don't need much). Add cooled spinach and shallot mixture and blend well. Add more salt to taste. If mixture seems to "spinachy" add a little more ricotta. Proportions are not too critical here, you just need to have a good consistency to make the nests for the egg. Taste and add more pepper if desired.

Now you are ready for the fun part! Find a glass or something you can use to make roughly a 5" in diameter circle. Take your sheets of fresh pasta that have been resting for the past 15 minutes, and cut them in half so that each sheet is roughly 6" x 15" (this will make them a little easier to work with). Flour your surface to keep the sheets from sticking. Take your glass and gently mark out 4 ravioli on a sheet. Spoon about 1-1/2 tablespoons of the ricotta mix in the center of each of the four circles. Form the mixture into little, equally shaped nests using a teaspoon or your fingers, their rims have to be high enough to keep the egg yolks from escaping.

Carefully divide the eggs (the egg yolks must stay whole) and gently place one yolk in the center of each ricotta nest. Take one of the unused egg whites and brush the pasta around the ricotta, in order to make the pasta sheets stick together well. Gently place another pasta sheet over the ricotta/egg yolk arrangements and tightly seal each one to avoid any air trapped inside. Stamp out the individual ravioli with your glass or mark and cut with a pasta cutter. Repeat 2 more times until you've made 12 ravioli.


Cook the ravioli in a large pan of salted, slightly boiling water for two to three minutes until just al dente, but with the egg yolks still runny. Meanwhile, melt the remaining butter in a frying pan and brown for a few minutes if desired. In another pan brown the pancetta. Drain the ravioli using a skimmer, place on a warm dish, then top with the butter, freshly ground pepper, a little extra grated Parmesan and place the pancetta on the side. Prepare for an amazing gastronomic experience!

Pasta all'Uovo - Basic Egg Pasta Dough

Beth Ribblett

My standard pasta recipe is Lidia Bastianich's from her book Lidia's Italian Table. It is simple, delicate and comes out perfect every time I've made it. I use my Kitchen Aid Mixer for the initial blending and then add the pasta roller attachments when it is time to roll it out. When possible, I like to use farm fresh eggs (the fresher the better) that we buy from Justin Pitts at the Crescent City Farmer's Market.


This is Lidia's recipe when using an electric mixer. Her book also details mixing the dough by hand as well as with a food processor.

Ingredients
4 cups unbleached flour
6 large eggs
1/2 t. salt
1/2 t. olive oil
warm water as needed

Directions
Place all but 1/3 cup of flour in the mixing bowl of a of a heavy duty electric mixer fitted with the dough hook. In a small bowl, beat the eggs, salt and olive oil together until blended. With the mixer on low speed, pour the egg mixture into the mixing bowl. Knead just until the mixture comes together to form a rough dough. If necessary, drizzle a very small amount of warm water into the bowl.


Remove the dough from the bowl and knead using the remaining flour, and more if necessary, using the following method.Once you have formed a rough dough, it is ready to knead. Flour a marble or wooden work surface. Press the heel of one handing deep into the dough, keeping your fingers high. Then press down on the dough while pushing it firmly away from you-the dough will stretch and roll under your hand like a large shell. Turn the dough over, then press into the dough first with the knuckles of one hand, then with the other; do this about ten times with the knuckles of each hand. Use the knuckles of your forefingers especially during this process.


Then repeat the stretching and "knuckling" process, using more flour if needed to prevent sticking, until the dough is smooth and silky, 10-2o minutes. Roll the dough into a smooth ball.Place the dough in a small bowl and cover with plastic wrap. Let the dough rest for at least 1 hour at room temperature, or up to 1 day in the refrigerator, before rolling and shaping the pasta. If the dough has been refrigerated, let it stand at room temperature for at least 1 hour before rolling and shaping.


Rolling the dough with a pasta machine (I used the Kitchen Aid attachments). Cut the ball of dough into 6 equal pieces. Shape each piece into a rectangle about 5x3 inches. Lightly flour the pasta rectangles and cover them with a kitchen towel. Set the rollers of the pasta machine to the widest setting. Pass one of the pasta rectangles through the rollers long side first, then pass it though the rollers a second time. Repeat with the remaining pieces of dough. Keep the dough lightly floured-just enough to prevent if from sticking to the rollers. Reduce the width by one setting and pass each piece of dough through the rollers two times. Support the dough with your hand as it comes through the rollers-don't pull it though, or the dough will shrink so it is narrower than the width of the rollers.


Continue working with the pieces of dough in the same order and reducing the width one setting each time until all pieces of dough have been passed through to the proper setting. (Each pasta machine is different. Consult the directions for proper setting of your equipment the type of pasta you are making); the pasta sheets should be about 5-1/2 x 30 inches. Always keep the pieces of dough that aren't being rolled covered with a towel. If you find the dough is very elastic, let all pieces rest for 5 to 10 minutes before continuing. Once all pasta has been rolled into sheets, let them rest, completely covered with towels, for about 15 minutes before cutting them.

Now comes the fun part of deciding what you want to do with these beautiful sheets of dough. Linguine and fettuccine will need another cutting attachment or a hand crank pasta roller. Lasagna, ravioli, papardelle, cannelloni can all be cut by hand from this point.